curl -o- https://raw.githubusercontent.com/nvm-sh/nvm/v0.39.1/install.sh | bashexport NVM_DIR="$([ -z "${XDG_CONFIG_HOME-}" ] && printf %s "${HOME}/.nvm" || printf %s "${XDG_CONFIG_HOME}/nvm")"[ -s "$NVM_DIR/nvm.sh" ] && \. "$NVM_DIR/nvm.sh" # This loads nvmnvm install --ltsnvm use --lts
sudo apt install git build-essential pythonnpm install -g npm
mkdir ~/.npm-global npm config set prefix '~/.npm-global' export PATH=~/.npm-global/bin:$PATH source ~/.profile
npm install ganache -g
npm install truffle -g
git clone https://github.com/adorsys/p2p-lending.git
ganache -p 8545 &
cd p2p-lendingrm package-lock.jsonnpm installtruffle compilenpm run migrate:dev
npm config set /usr/bin/python
cd frontendnpm uninstall node-sassnpm i -D sassrm -rf node_modules package-lock.json && npm install
npm start
That’s it. Hope it could provide some insights when you try to use the P2P-Lending, but strongly not recommended.Since I’m not familar with blockchain, so not sure if there is any alternative to the P2P-Lending.If anyone knows, please share in the comments. I will let my friend know.Thanks in advance.
]]>This comparison is based on a developer perspective, who is fresh to AWS and expert (self-claimed) in GCP.
Both can start coding without documents when using the first time.I feel this is a great advantage to move product to cloud, saving tons of development time.
However, I feel Cloud Function is simpler, agile, and more intuitive compared to Lambda based on the following:
So the winner is obvious, Cloud Function is the better choice if you don’t want to deal with package installation or HTTP trigger settings.
This one I have to say that AWS has impressed me.Every time if I clicked the save, the code has already deployed, although this comes with a drawback that less customizability.I enjoy this fast and non-interrupted deployment process.Almost every service could be instantly provisioned, modified, and deleted.(So far our codebase is relatively small like ~500 lines of code for each service)
So what does the GCP lack?
All in all, GCP feels slower in many aspects, so AWS has a smoother user experience.
Lambda auto wins this track, due to an on-going log issue in Cloud Functions, which causes no logging when function crashes.Besides the issue, both provide detailed trace logs.Moreover, Lambda provides a configurable test event to run the function on the fly, which really neat.
This won’t affect the user experience for experts, but definitely a plus for newcomers.Maybe just because I’m newbie to AWS, I always find it difficult to read the official documents.
Actually, cloud techniques are pretty alike among providers.Although the under table infrastructures may differ, the user-level implementations do not vary too much.With better doc would attract more people who are new to the cloud.From this perspective, GCP did a very good job of providing tutorials and tools.
This influences the least to developers.It is no good or bad, it is all depending on the traffic volume and the boss’s preferences.
Provider | Lambda | Cloud Functions |
---|---|---|
Pricing | 1M/month requests and 400K GB-sec/month compute time for free, then $0.20/1M requests and $0.00001667/GB-sec | 2M/month requests and (400K GB-sec/month, 200K GHz-sec/month) compute time for free, then $0.40/1M invocations, plus $0.0000025/GB-sec and $0.00001/GHz-sec |
Cloud Functions have a more complex formula to calculate the compute time pricing.Basically, it adds the CPU usage (GHz-sec) into the calculation.So Lambda is cheaper if not using the provisioned concurrency, which charges extra cost.
Here comes the question, does Cloud Function have a similar provisioned concurrency feature?
This is a general talk about how to integrate services on different cloud platforms, not specified to cloud functions or lambda.
Both products are integrated well with other cloud products within the same cloud provider.Unless there is a unique cloud service, most development could be done within a single cloud provider.If you feel the developers do not have enough work, distribute your services into two or three cloud providers.They will spend most of their time on how to integrate those services, instead of actual development.
This comparison is based on my personal experience.Both have advantages and disadvantages, please choose based on your use cases.But keep in mind, don’t try to integrate them!This is the only advice I learned from using both.
]]>If anyone has used the Google Cloud Function, they probably stuck at the limited system packages [1]. There is no curl
or wget
, and could not customize the runtime system.Like the document stated, it is a fully managed environment.Someone may jump out and yell out the name Cloud Run.Yes, Cloud Run will be the successor of Cloud Function in many aspects.However, it does not support the trigger from the Cloud Storage bucket.Yes, yes, yes, you can use Pub/Sub in Cloud Run to implement the bucket trigger.But why not keep it simple?
During the local environment testing, we normally use gcloud auth application-default print-access-token
[2] to get the authentication to call the Google API endpoint.It could be integrated into a curl
command within a script or subprocess in your code.You may see the following command in may GCP API tutorials:
curl -H "Content-Type: application/x-www-form-urlencoded" -d "access_token=$(gcloud auth application-default print-access-token)" https://www.googleapis.com/oauth2/v1/tokeninfo
After tested everything working fine on our local machine, it is time to move to the cloud.We assume the Google Cloud will handle the credentials for us, because we are accessing resources withing the GCP, and using the same service account.Our assumption will be busted by the brutal reality.We still need to explicitly create credentials when calling other GCP services.
This becomes a barrier when moving to the Cloud Function.The initial thought would be using the Python subprocess to call curl
command.As stated above, the curl
does not exist and could not be installed in the Cloud Function system.Luckily, the curl
command can easily be replaced by the Python request package.But, how about the gcloud auth
? It is also not included in the system packages. So here is the solution.
We know there is a google-auth Python package [3] to handle GCP related authentications.The google.auth.default()
could return a credential object which has a token field.Looks promising, isn’t it?How about getting the token from google-auth?So I wrote the following code:(The following code could be directly run in Cloud Function)
import google.authdef get_token(request): cred, project_id = google.auth.default() return f'{cred.__dict__}'
Well, the output shows nothing:
{'token': None, 'expiry': None, '_scopes': None, '_service_account_email': 'default'}
The google-auth package is not open source, so I could find the logic when the token field is populated.Therefore, I came up with an assumption that the token field would be populated during usage.I will use Document AI as an example, you could use other GCP services, I think the logic behind should be the same.I rewrite the sample code [4] to fit the Cloud Function:
import google.cloud.documentai as gcdimport google.authdef get_token(request): cred, project_id = google.auth.default() gcd_client = gcd.DocumentUnderstandingServiceClient(credentials=cred) req = gcd.ProcessDocumentRequest( parent=f"projects/{project_id}", input_config={ 'gcs_source':{ 'uri': 'gs://cloud-samples-data/documentai/form.pdf'}, 'mime_type':"application/pdf"}, document_type="general", form_extraction_params={'enabled': True}) return f'{cred.__dict__}'
Still, the token
is None.Okay, seems it has not been updated at all.I only used the document AI package initialization to avoid the extra charge on invoking the actual process.However, if we actual process the document by adding response = gcd_client.process_document(request=req)
before the return statement.The magic happens.
import google.cloud.documentai as gcdimport google.authdef get_token(request): cred, project_id = google.auth.default() gcd_client = gcd.DocumentUnderstandingServiceClient(credentials=cred) req = gcd.ProcessDocumentRequest( parent=f"projects/{project_id}", input_config={ 'gcs_source':{ 'uri': 'gs://cloud-samples-data/documentai/form.pdf'}, 'mime_type':"application/pdf"}, document_type="general", form_extraction_params={'enabled': True}) response = gcd_client.process_document(request=req) return f'{cred.__dict__}'
To avoid the security breach, I will not post the output here.You will see the token
field has the value we are seeking for.Well, we have to pay for the usage of the document AI API calls.
We could use the Cloud Logging SDK, which does not need many details for the request body.Comparing to the previous method, the cost is even lower, almost free [5].
import google.authimport google.cloud.logging as cloud_loggingdef get_token(request): cred, _ = google.auth.default() cloud_client = cloud_logging.Client(credentials=credentials) log_name = 'cloudfunctions.googleapis.com%2Fcloud-functions' cloud_logger = cloud_client.logger(log_name) all_entries = cloud_logger.list_entries(page_size=1) entries = next(all_entries.pages) return f"{cred.__dict__}"
If we could use different Cloud Python SDKs, is there an SDK can have a minimal number of line of code?Yes, here is what I found – Cloud Translate, which charges based on the translated characters [6].So we only need to process one char to obtain the token.The free tier quota (500,000 chars) is big enough for testing purposes.
from google.cloud import translate_v3import google.authdef get_token(request): credentials, project_id = google.auth.default() client = translate_v3.TranslationServiceClient(credentials=credentials) parent = client.location_path('project-id', 'us-central1') response = client.translate_text('a', target_language_code='en', parent=parent) return f"{credentials.__dict__}"
The pattern is:
You can come up with your solution by using different Python SDKs [7].
If there are Python SDKs for GCP services, why bother to get the access token, call them directly in your code.
Anyway, this is a great example of rebuilding the wheel process, hope can provide some insights!
[1] https://cloud.google.com/functions/docs/reference/python-system-packages
[2] https://cloud.google.com/sdk/gcloud/reference/auth/application-default/print-access-token
[3] https://google-auth.readthedocs.io/en/latest/
[5] https://cloud.google.com/stackdriver/pricing
]]>TL;DR: I choose QT as sibe project GUI creator for its strong community and webassemble support.
Before I start mubling, I would like to state my view on the GUI vs CLI.I like to use CLI, as it is easy to integrate with pipe and automation process.Also devloping CLI is focusing on functionality instead of aligning pixels.Moreover, it feels geek and cool.However, I also found the esiest understandable application usually have a good GUI.A picture is worthing a thousand of words.GUI is that picture in a program.The best applications in my mind is that have both GUI and CLI.
Recently, I was looking for a GUI library which is open source and cross-platform.The first thing comes to my mind is the web development, like React and Vue.However, JS has bad reputation on performance, and my side project is based on video processing.Then I googled a little bit, seems webassemble is the best solution to overcome the performance concerns.But QT can also generate webassemble applications.
After trying both, I have conclude their pros and cons in the following:
In summary, webassemble is still not mature for building a project.If you still don’t want to miss this trends, use QT instead.As it can also generate webassemble application, meanwhile, doesn’t need to worry about the low level implementation.
]]>Locate the python Gym package folder. In my case, it is under ~/anaconda3/envs/openai-gym/lib/python3.5/site-packages/gym
.
Download the Gym 0.9.5 source code which contains the board games environment.
Copy the board_game folder from 0.9.5 source code (under /gym-0.9.5/gym/envs/
) to your local Gym package envrionment folder (my case is ~/anaconda3/envs/openai-gym/lib/python3.5/site-packages/gym/envs
).
Add the following code into init.py (~/anaconda3/envs/openai-gym/lib/python3.5/site-packages/gym/envs/__init__.py
). It will register those envs.
# Board games# ----------------------------------------register( id='Go9x9-v0', entry_point='gym.envs.board_game:GoEnv', kwargs={ 'player_color': 'black', 'opponent': 'pachi:uct:_2400', 'observation_type': 'image3c', 'illegal_move_mode': 'lose', 'board_size': 9, }, # The pachi player seems not to be determistic given a fixed seed. # (Reproduce by running 'import gym; h = gym.make('Go9x9-v0'); h.seed(1); h.reset(); h.step(15); h.step(16); h.step(17)' a few times.) # # This is probably due to a computation time limit. nondeterministic=True,)register( id='Go19x19-v0', entry_point='gym.envs.board_game:GoEnv', kwargs={ 'player_color': 'black', 'opponent': 'pachi:uct:_2400', 'observation_type': 'image3c', 'illegal_move_mode': 'lose', 'board_size': 19, }, nondeterministic=True,)register( id='Hex9x9-v0', entry_point='gym.envs.board_game:HexEnv', kwargs={ 'player_color': 'black', 'opponent': 'random', 'observation_type': 'numpy3c', 'illegal_move_mode': 'lose', 'board_size': 9, },)
pip install pachi-py
for go env.Then it’s all set to use the board game environment.
All in all, Gym is built for testing reinforcement learning, and the reinforcement learning gains fames from the DeepMind AlphaGo. Personally, removing Go env from Gym is not a smart move for marketing.
]]>Here is a list of problems which both on Leetcode and EPI1. In my opinion, these common appeared questions are more important. Hope this could help job seekers to prepare for their final interviews.
Leetcode2 | EPI3 | Difficulty4 | Problem5 | Company6 |
---|---|---|---|---|
21 | 7.1 | Easy | Merge Two Sorted Lists | Amazon |
20 | 8.3 | Easy | Valid Parentheses | Amazon |
8 | 6.1 | Medium | String to Integer (atoi) | Amazon |
48 | 5.19 | Medium | Rotate Image | Amazon |
15 | 17.4 | Medium | 3-Sum | Amazon |
42 | 24.32 | Hard | Trapping Rain Water | Amazon |
121 | 5.6 | Easy | Best Time to Buy and Sell Stock | Amazon |
89 | 15.10 | Medium | Gray Code | Amazon |
235 | 9.3 | Easy | Lowest Common Ancestor of a Binary Search Tree | Amazon |
98 | 14.1 | Medium | Validate Binary Search Tree | Amazon |
141 | 7.3 | Easy | Linked List Cycle | Amazon |
240 | 11.6 | Medium | Search a 2D Matrix II | Amazon |
234 | 7.11 | Easy | Palindrome Linked List | Amazon |
215 | 24.17 | Medium | Kth Largest Element in an Array | Amazon |
579 | 13.12 | Hard | Find Cumulative Salary of an Employee | Amazon |
Here is the question:
A company receives thousands of documents everyday uploaded by our users. Generally these documents are invoices or bills. We would like to extract the vendor and amount from these documents automatically (i.e. using software rather than human inspection).
They store the following pieces of information for each document:
- The pdf document uploaded by the user (please see example.pdf attached)
- The text extracted from that pdf (please see example.txt attached - Note: often the extracted text would not be in an order that seems natural to a human reader)
- Labels of what the vendor and amount should be for each document (in the attachedexample, vendor would be “Marketing Fuel Biz.”, and amount would be “747.50”).
Question: Describe a machine learning solution to this problem.
Additon: Some percentage of the stored labels may be incorrect. What would you change to mitigate this problem.
The sample pdf and OCR output txt is downloadable.
As the OCR result loses the invoice position information (sample txt file), the traditional NLP methods, which expect sequential structure, would not work on such text corpus [1]. So my proposed solution would focus on rebuilding the invoice structure information.
Based on my understanding, the invoice structure follows a certain pattern, such as the left top area is vendor logo/name and the total amount is in the bottom right. There are definitely some special cases, but the prior statement is an assumption of my solution.
In order to track the position in a PDF file (could be easily convert to an image file), the convolutional neural networks (CNN) [2] could fit this task, it has been proved successfully on many image processing tasks [3, 4, 5]. Although a paper [6] states to extract invoice info from the recurrent neural network (RNN), their input is words and positions (in our case, we do not have positions). So I propose to use Faster R-CNN [4] or YOLO [7] to solve the problem, they both are mature models of object detection and applied in many products.
The CNN model input should be images, and outputs are labels and region coordinate (the format would be like {vendor, 5, 15, 20, 40}).
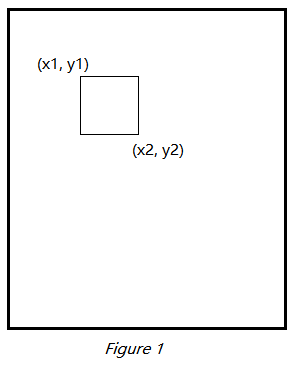
Therefore, we need a dataset to train the CNN model. Since we already have the original PDF files and labels of vendor/amount, we could generate an image dataset for training the model. For each training entry, it contains an image converted from PDF and a region info of vendor/amount. The region info is the coordinate of two points which consist of a rectangle (e.g. (x1, y1) and (x2, y2) in figure 1). The dataset generation process could be done via a method of ORC and image process combination. The method is cropping the image into multiple rectangles (moving windows), then apply ORC on each rectangle. Based on the text outputs of rectangles, the area contains only vendor name is labeled as vendor, and the areas contain the amount are labeled as amount.
After we have the dataset, we split it into training and testing datasets. The split ratio could be 80/20 [8].
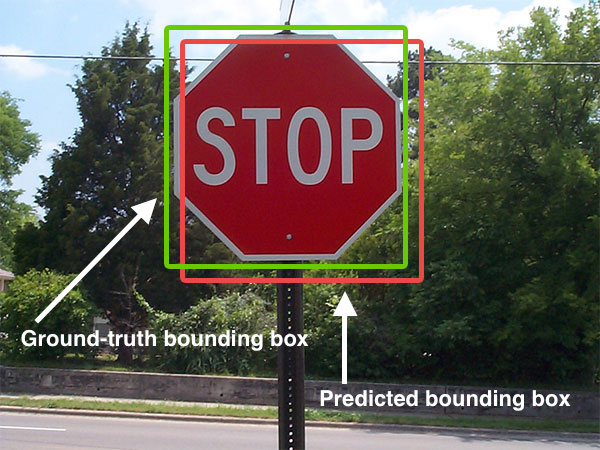
The evaluation metric is mean precision average (mPA) at the different intersection over union (IoU) thresholds. The IoU of a proposed set of object pixels and a set of true object pixels is calculated as IoU(A,B)=A∩B/A∪B (image below [9]). The metric sweeps over a range of IoU thresholds, at each point calculating an average precision value. The threshold values range from 0.5 to 0.95 with a step size of 0.05: (0.5, 0.55, 0.6, 0.65, 0.7, 0.75, 0.8, 0.85, 0.9, 0.95). In other words, at a threshold of 0.5, a predicted object is considered a “hit” if its intersection over union with a ground truth object is greater than 0.5. At each threshold t, we can check if it “hit” on the ground truth. Then the mPA is 1/thresholds∑hit(t).
When the model training finished (let’s assume it meets our expectation), we could apply a post process to convert the result to our label. We will get the region coordinate from the model output, and based on the coordinate, we can crop the rectangle and feed it to OCR. It is the final result. Then we can compare the predicated labels with our ground truth in the database to evaluate the model performance (the evaluation metric could be precision on both labels).
Here is the overview of the proposed solution:
Convert PDF to Image -> Dataset Preparation -> CNN Model -> OCR -> Results
To mitigate the impact of incorrect labels, we could add an extra step in dataset preparation. By calculating the frequency of each vendor label in the dataset, we could remove those entries with label frequency lower than a threshold. This is based on an assumption that incorrect labels cannot occur multiple times (the threshold) with the same value.
I set up an experiment for the solution, which trained YOLOv3 [10] (pre-trained on ImageNet [11]) with 30 manually labeled invoices images (google searched images, each invoice contains vendor, logo, and amount labels). Although the predicated labels on validation dataset look promising, the mAP is almost zero on the test dataset. The reason for the low performance may be caused by the principle of CNN, the CNN only can learn the features that appear in the training set. The way to improve the model would be training on a larger dataset and assume it covers all test cases. Therefore, I would like to propose two new solutions for the ML question.
I reviewed the example.txt file, it doesn’t fully unorganized. We could recognize some patterns from it, like it reads column by column, not row by row as human do. Although RNN is good at the sequential data, due to the gradient vanishing problem, it won’t work for long sentence. So the LSTM method came up, bring the ability to memory long distance relationship to RNN. For example, “A cat jumps on the table, it breaks a cup, so we chase it off the table” which “it” represents the “cat” in the previous phrase. It may be easy to identify the first “it” as the cat because they are close, but for the second “it”, it’s hard to tell which it represents (cat, table, or cup).
As we are processing the text data, we need a preprocessing step to clean up. First, remove punctuation marks, like semi-colon, colon, exclamation mark, and etc. But keep the period and comma, because they may use in numbers. Second, tokenize the words, we could build up a vocabulary dictionary and convert each word into it represented the index in the dictionary. For unknown word and numbers, we use [UNK] and [NUM] instead. Finally, clear up the common words which do not help for our task, like the word “invoice”, it appears in every invoice.
Then we could feed the data to the RNN model. The RNN model supports many to many. Input is word sequence, and the output is the all possible labels for vendor/amount.
The evaluation metric would be the F1 measurement [14], which combines the precision and recall.
When AlphaGo [15] defeats the world champion Lee Sedol, reinforcement learning becomes a hot topic in AI domain. The reinforcement learning is an algorithm to make AI compete with AI, the best set of policies is searched out during the competition. It has successfully applied to robotics, game playing, fintech, and ect. [16]
The reason I pick up the RL is the intuitive thought in my previous email. For a human, it is easy to identify vendor and amount by a glance, so the images contain all the info we need. Therefore, I think it is not necessary to take an extra step to convert the images to text, which lose information and create an extra layer to process.
So the idea is to find out the areas in invoice images which represent vendor and amount, then apply OCR against those areas to get final text formatted outputs.
Preprocess input documents to convert them into greyscale images.
Before we feed images into RL model, we need to set up rules for the agents, like identify the correct item plus points, identify the logo get some point, output wrong result get minus points. Then the RL model could brute force to find the best policies, like font size, bold style, and etc.
The RL model output should be the rectangle area of the vendor/amount. Then apply OCR to convert them to text.
The evaluation metric should be same as above, using the F1 score.
In addition to the above methods, I also thought about the generative adversarial networks (GANs) [17], but the tuning process is more like mystery comparing other models. Moreover, I found a paper [18] that using the deep CNN model to classify document images based their structure. In our case, I think we could use the similar approach to identify vendors, but we still need more info to retrieve the amounts.
BTW, besides the machine learning models, I wonder we also could improve the OCR to include the structure information in the output, like the PDF to HTML [18] and Zonal OCR [19]. If the company mainly deal with PDF files. As the PDF format specification [20] is open to the public, we could analysis PDF files directly, this would be another story.
]]>Here I will record all the pitfalls, caveats, and tricks during the building processes. Hope could provide some help or hint for people would like to build their dream game (or amateur machine learning) machine.
Here is the components list for my build on PCPartPicker. The currency is Canadian Dollar since I’m living in the cold North (but don’t have the wall of cause).
Parts | Brand | Purchase Price | Comment |
---|---|---|---|
CPU | Inter Core i7-7700K 4.2Ghz Quad-Core | $427.95 | From Memory Express. |
GPU | 2 X MSI GeForce 1080 DirectX 12 GTX SEA HAWK | $732.99 X 2 | From NewEgg. Got total $40 mail-in rebates |
CPU Cooling | Corsair H100i v2 Hydro Liquid CPU Cooler | $124.99 | From Memory Express |
Motherboard | ASUS PRIME Z270-A LGA 1151 | $199.99 | From NewEgg |
Disk | Kingston SSD A400 480GB | $194.10 | From Memory Express |
Memory | Kingston HyperX Fury 32GB DDR4 2666MHZ 4X8GB | $269.99 | From Memory Express |
Case | Fractal Design Define S ATX Mid Tower Window Case | $89.99 | From Canada Computers |
Power | EVGA SuperNOVA 750W G2L Modular PSU | $139.99 | From Memory Express |
Extra | Asus USB-AC51 Dual-Band Wireless AC600 Wireless Adapter | $39.99 | From Memory Express. Got $10 mail-in rebates |
I have spent about a month to collect all parts. The reason why it took so long is I would lik to get the price as cheaper as possible. To ensure that, I have developed several “techniques”.
The tricks use here are suitable for Canada or best North America, because these online services/stores are only shipping within North America or Canada only. However, you could definitely find alternatives within your regions/countries (check out PCPartPicker support countries).
First of all, don’t forget using ebates. It’s a online rebate website, user could get instant rebate if purchase through the ebates supported vendors online. The rebate rate is from 1% to 5%. Although not much, better than nothing.
Second, use price matching. Many online store support price matching, some even give 10% more off (I only found one). The Memory Express is one of my favorite computer component online shop. It provides the lowest prices most of the time, moreover, its price match is better – match the price plus 10% off on the difference. E.g, a CPU costs $500 on ME, another store has lower price for the same CPU, let’s say it $400, then the price on ME after the price match is 400-(500-400)*10% = $390. The only con shopping on ME is they charge shipping fee and don’t have local store in east Canada.
As mentioned above, the shipping fee may also cost a lot, especially the item weight increases. So if online store has physical store, use pick up wisely. I have purchased several parts on NCIX and Canada Computer just to save the shipping fee. Even more, both also provide price match, which make them more affordable.
Amazon also has great deals eventually, but due to the currency exchange rate Amazon Canada alway have match higher price regardless of the physical distant is so close. Therefore, using Amazon US is also a good option if living near the boarder. Sometime, even including the import fee purchasing from Amazon US, the price is still cheaper than in Canada. What a life Canadian is!
Finally, wait holiday or promotional events. Especially Boxing day, you could get the best price. However, normally the quantity are limit. One of my friends bought he loved GPU by lining up at 5am in front of the store.
It is usually easy to assembly the parts (just follow the manual), however, my build is a little bit special that have three radiators – one for CPU, two for GPU. Not many people using dual GPU with AIO liquid radiators, which makes there is no much info online to help me choose the right case.
After googling, I conclude the Define S could be the best fit for my needs. But I was only half right. Define S is well designed for water cooling system, and beautiful out look. I’m definitely satisfied with the choice. However, the case is a little bit wider to put the GPU AIO radiator on the front panel.
As the above pic shows, I have no options to put the radiator into the tiny space beside PSU. Here is the part I love Define S, it supports the bottom fan and saves my day. Otherwise, I would have to disassemble all parts and exchange another case, then do it again.
At the bottom front panel, another fan is installed to pull air in to provide positive air pressure. The air flow inside the case illustrates in the following pic:
After a day and a night, the PC finally up and run. Here is some conclusions I learned:
Here is the complete shot:
Update(2017-Aug-14): I also bought an M.2 SSD to install the Ubuntu OS, as the most machine learning algorithms are build upon Linux system. Moreover, the driver officially provided for the Asus USB-AC51 is not compatible for Ubuntu 16.04 LTS (I also tried several customized drivers, they may fit the 14.04 LTS but not the 16.04). So be careful when purchase the USB Wifi adapter, here is a list that has some “work out of box” USB for Ubuntu 16.04 and above.
Update(2019-Jun-24): Recently bought another M.2 SSD for share disk between Ubuntu and Windows. Due to recently SSD price drop, the 960G SSD only cost $150 (included tax). Even cheaper and faster than 500G SATA SSD I bought 2 years ago. How technology changes so fast! To mount the new SSD in Ubuntu, I followed the top answer in the StackOverflow post.
]]>Although those three options works like a “charm” in a small amount of repos, it’s more like chores when maintaining hundreds forked repos.
Then I came up the idea to use Travis-CI to sync those repos automatically. The mechanism is simple and straightforward, which runs a script periodically to update forked repos with source repos. The script could be bash, javascript, python, or any language which could call git command in the Linux OS.
Based on the above idea, I wrote a js script to do the job. But this script is only a solution my problems:
If your needs also match the aboves, then simple fork my script, and modify the org
in .config.yml
.
When you’re visiting my website, you may not see the https in the URL, which means you have been directed to a CDN node other than my VPS server. This doesn’t mean the method doesn’t work. Anyway, let’s begin the talk.
The purpose of this post is to help people to avoid the pitfalls that I encountered, and severs as a note for future reference.
ACTIVATE10
], Vultr[Get $50 (expired after 6 months) with coupon code DOMORE
], Lindo[Get $20 with coupon code PodcastInIt20
], and etc.Only two docker images are used:
The niginx server has to start up before running the letsencrypt, because the letsencrypt needs to access the server to finish the generating certificate process.
Create docker-compose.yml
and paste the following into it.
nginx: image: bringnow/nginx-letsencrypt volumes: - ./nginx.conf:/etc/nginx/nginx.conf - /etc/letsencrypt:/etc/letsencrypt - /var/acme-webroot:/var/acme-webroot - /srv/docker/nginx/dhparam:/etc/nginx/dhparam ports: - "80:80" - "443:443" net: "host" dns_search: - "example.com"
Modify it accordingly to fit your environment.
Although the nginx docker will create DH parameters on initial start up, it is time comsuming to generate the 4096 bit DH parameters (more than an hour on my VPS). Run the following command and copy the generated file to the /srv/docker/nginx/dhparam
folder (set in docker-compose.yml).
openssl dhparam -out RSA4096.pem -5 4096
In order to complete the letsencrypt challenge, the server has to open the 80 port. The nginx-letsencrypt image already come with the setting snippets: snippets/letsencryptauth.conf
and snippets/sslconfig.conf
.
Here is the sample config file:
events { worker_connections 1024;}http { include snippets/letsencryptauth.conf; include snippets/sslconfig.conf; server { listen 443 ssl default_server; server_name example.com www.example.com ssl_certificate /etc/letsencrypt/live/www.example.com/fullchain.pem; ssl_certificate_key /etc/letsencrypt/live/www.example.com/privkey.pem; add_header Strict-Transport-Security "max-age=31536000; includeSubdomains" always; location / { # Just return a blank response return 200; } }}
NOTE: Please comment out those two lines start up ssl_certificate before the certificate generated.
Now run the following command to bring Nginx online:
docker-compose up -d
To confim if the docker is running correctly, we could look the log file to check:
docker-compose logs
If there are some error messages, please check the Nginx config file and restart the docker.
In another folder, create a docker-compose.yml:
cli: image: bringnow/letsencrypt-manager:latest env_file: config.env volumes: - /etc/letsencrypt:/etc/letsencrypt - /var/lib/letsencrypt:/var/lib/letsencrypt - /var/acme-webroot:/var/acme-webrootcron: image: bringnow/letsencrypt-manager:latest env_file: config.env volumes: - /etc/letsencrypt:/etc/letsencrypt - /var/lib/letsencrypt:/var/lib/letsencrypt - /var/acme-webroot:/var/acme-webroot command: cron-auto-renewal restart: always
Modify it accordingly. Make sure the folder /var/lib/letsencrypt
and /var/acme-webroot
have created and exist.
Then create config.env file in the same folder and input your email:
LE_EMAIL=LE_RSA_KEY_SIZE=4096
Finally, we could create our Https certificate. Run the commands:
docker-compose run cli add <domain> [alternative domains]
If it fails, please check if Nginx is runing and the DNS setting is correct.
NOTE: If the certificate generate, don’t forget to remove comment on ssl_certificate lines in Nginx config file, and restart it.
Now your website should up and running with https. Enjoy.
~ EOF ~
]]>